
Cinda Asp, cinda.asp@gmail.com
Places to purchase bandanas:
Hobby Lobby - often there is a coupon on website
JoAnns - bandanas and free project instructions on website
www.tansclub.com, www.wholesaleforeveryone.com, www.ihomewholesale.com, www.bandanaworld.com,
www.orientaltrading.com, www.giftwagon.com, www.bandanashop.com, www.amazon.com, www.bandanaman.com - custom made bandanas, www.coveryourhair.com, www.westernexpressinc.com, www.wisebread.com - link to instructions for folding bandanas around flatware, curtain tiebacks, halter top, bag, lampshade, www.bjcraftsupplies.com
Patterns
www.birchstreetclothing.com - patterns and bandanas for apron, back pack, baby clothes, hat
www.angelfire.com - FREE patterns for drawstring pouch, bonnet, tot skirt, halter top, child sleeveless top, kids
shorts, apron, tote bag, kits pants
www.makingfriends.com - FREE instructions for halter, no-sew pillow, no-sew tote bag, mini bandana pins
www.squaredancesewing.com - free instructions for prairie skirt, bag, beaded neck kerchief
Bandana Skirt
1. Need 8 bandanas for the skirt, one for the waist band, one for a collar. Total of 10.
2. Use a gore pattern from any eight gore skirt pattern or a pattern similar to this drawing. These measurements allow for a •••” seam allowance.
Your preferred skirt length plus •••” seam allowance
15” – 16”
7” – 8”
3. Pick bandanas with a design that looks okay on the diagonal. Also, watch for large, different colored logos on the border. You may be able to cut around these.
4. Cut each bandana but cut carefully, trying to match up the designs.
5. Use one bandana to piece together a waist band the length of A times 8 plus a seam allowance. The length of A will vary depending on the length of the skirt, so measure after you have cut your first piece.
6. For the width of the waist band, use the measurement of your favorite belt or elastic, add •••” seam allowance and double this. Ex: If your elastic is 2”, and •••” and get 2.5”, double this and get 5” for the width.
7. Attach waist band (could be made from scraps), insert elastic.
8. Left over scraps or bandanas can be pieced together to make a belt.
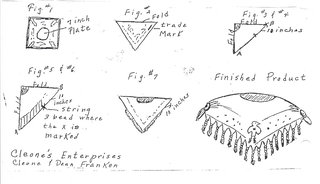
Bandana Collar
|
Materials needed
One bandana |
Glue that dries transparent |
|
7 inch plate |
60 beads of each color |
|
2 large oval conchos |
Or 2 yards of eyelet, lace, or fringe |
|
2 medium size conchos |
2 small safety pins |
|
18 inches Leather stripping |
Nailheads & rhinestones to decorate |
1. Lay bandana out on a flat surface. Place a 7 inch plate in the center as in Fig. #1. Be sure to measure to each corner of the design, to make sure plate is in the center. Draw a line around the plate.
2. Cut out center of bandana. Glue the edges down or hem.
3. Fold bandana in triangle. Make sure the trade mark is on a corner where you will put the large oval concho. Line up the design of your bandana and pin. It helps to hold it up to the light. As in Fig. #2.
4. Fold in half again, as in Fig. #3.
5. Measure down 10 inches from point B and pin or mark as shown in Fig. #4. You will not cut in this area.
6. Starting from the center, or point A, of bandana. Measure ••• “ from the half fold, and mark for the first slit. Continue marking & measure 1 “ wide a part for the remaining slits as shown in Fig. #5. You can make a pattern 1” wide and 4” long to measure your slits.
7. If your bandana has a border, this will be a guide line for you to stop cutting. Do not cut the slits over 3 inches high. They usually average about 2 •••” to 3”. You will average about 7 or 8 slits as in Fig. #5.
8. Thread 3 beads on each slit and glue the bottom bead. Do Not Knot. Glue on the back side of the beads. You will also put 3 beads on the last slit where you measured down 10 inches. Fig. #6.
9. For a different variety, you may use eyelet trip, lace or rayon fringe. It will take 2 yards of trim. Fig. #7.
10. Decorate bandana with nailheads, rhinestones & conchos as desired. For front of collar, use 9 inches of 1/8th or 5/32nd inch leather stripping. Fold the leather in half and pin (from back) to bandana where you want it placed. String concho on leather strip and criss cross through concho. String beads on leather strip. Glue or knot the bottom bead. Also glue the nailheads on the back so they will not come out.
11. The large oval conchos go on each corner that goes over the shoulder. Fold material into pleats and string on concho.
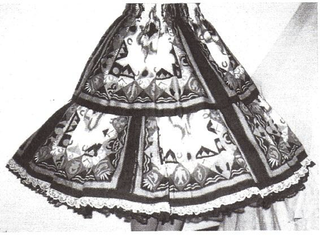 BANDANA SQUARE DANCE SKIRT
Supplies:
eight (8) – 22” square bandanas
elastic for waistband
matching thread
matching lace, if desired
Top of Skirt: Place 2 bandanas together with right sides facing each other. Place them so that the edge with printed words is on the top edge where it will be part of the waistband (allow 4 or 5” to turn over for waistband). Then sew the two parts together along one side using a narrow seam. Joint a third bandana to the other, then join the fourth, forming a circle of four bandanas. Cut the other bandanas in half to use for the ruffle. Measure for your length. Adjust the length of the upper bandanas according to the length of your skirt. Finish the waistband, inserting elastic (waist plus 1”).
Ruffle: When sewing the cut bandanas together for the ruffle, be sure the cut edges are along one entire side. This will be the side you add to the top sections. Join the ends together so that you have a circle. Using a gathering stitch, sew around the cut side •••” from the edge. Pull thread to form double fullness. Sew ruffle to the bottom edge of upper skirt, matching 2 widths of gathered half-pieces to one width of the straight upper skirt pieces.
Hem: Finish hem. Lace can be added, if desired.