61st National Square Dance Convention ®
June 27 - 30, 2012 - Spokane, Washington
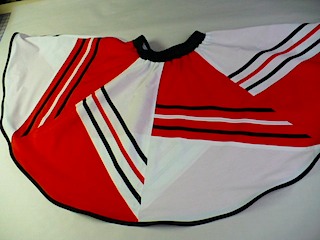
The instructions were written for the beginning seamstress. Some one who is more experienced may have other construction techniques. This shirt can be made in any length. The blouse, petticoat and other accessories can be any combination of red, white and black.
If you have any problems or questions please e-mail me by going to the the 'Contact Me' tab at the top of the page. I have tried to make these instructions clear and I would appreciate your input to make them better.
See you on the dance floor, Karen
Materials
1. 2 ½ yards Red Symphony Broadcloth or T-shot Poplin
2. 2 ½ yards White Symphony Broadcloth or T-shot Poplin
T-shot poplin is a slightly heavier fabric than Symphony Broadcloth. It is a poly-cotton blend that washes & wears well. T-shot makes great skirts but would not be suitable for a blouse.
3. 3 packages (4 yds/pkg) Black Wrights© Single Fold Bias Tape - ½ inch wide
4. 1 package (4 yds/pkg) White Wrights© Single Fold Bias Tape - ½ inch wide
5. 1 package (4 yds/pkg) Red (not scarlet) Wrights© Single Fold Bias Tape - ½ inch wide
Optional - Instead of Single Fold Bias Tape, ⁵⁄₈ inch wide Grosgrain Ribbon can be used. For each skirt 9 yards of black, 2½ yards of red and 2½ yards of white are needed. Steam-A-Seam can be applied to the ribbon in the same way as the bias tape to make it an iron on.
Optional - 2 packages (3 yds/pkg) Black Wrights© Extra Wide Double Fold Bias Tape - ½ inch wide This is for a bias hem treatment or 2 packages (3 yds/pkg) Black or Red Wrights© Piping - for a piped hem treatment.
6. Elastic for the waistband. This can be the choice of the seamstress.
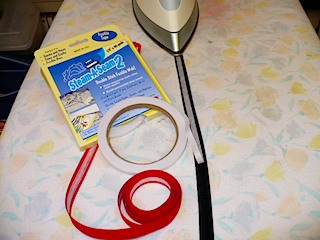
7. 1 box Steam-A-Seam 2® - ¼ inch wide - This is a double stick fusible web that will make applying the bias tape (or grosgrain ribbon) easier and reduce puckering. It is optional. Steam-A-Seam 2® is recommended over HeatnBond® because Steam-A-Seam 2® can be sewn through.
8. 40 pound test mono-filament fishing line - This will be explained in the instructions.
9. Thread - Red, black and white. Select good quality sewing thread for longer wear.
10. Size 80/12 Universal needle. Start a new project with a new needle. This is the least expensive part of this project. Don't skimp with an old needle.
Prepare - This will seem like a lot of work but it will pay off later.
Cotton fabrics will shrink. To reduce problems later get all of the shrinkage out of the way before starting to sew. Wash the fabrics in hot water with detergent. The detergent removes sizing from the fabric which can cause skipped stitches when sewing. Wash each color separately and look in the washer while it is washing. If the water it discolored with dye, then wash the piece again. This is a good place for several sewers to get together and wash a lot of fabric at the same time.
Some people recommend adding vinegar or salt to the wash water. I have read that this type of treatment is not as effective with todays dyes as it was with older formulas. If you do try these treatments don't be stingy. Place the fabric in a pan and add enough vinegar to completely soak the fabric. Then dump the fabric and vinegar into the washer and use just enough hot water to wash the fabric. A cup of vinegar added to 10 gallons of water in the washer won't do anything. If you are going to use salt add a cup full to the washer.
Dry the fabric completely in a hot dryer. It is the dryer that causes most of the shrinkage so make sure the fabric is dry and hot. Then iron the fabric, in a single layer, with an iron set for cotton.
Several dancers have recommended COLOR CATCHER which is a Shout brand product. They recommend using a sheet of this product when you wash the completed garments. It is like dryer sheets except that your add them to the was to trap dyes and protect your clothes. Follow the instructions on the package.
The bias tape and piping will also shrink. It is cotton and will pucker on the skirt if it is not preshrunk. I very carefully measured 36 inches of Wrights© Extra Wide double Fold Bias tape. I wrapped it back on the cardboard and shrank it in the microwave. After it dried over night I pressed it with a steam iron. It measured 34½ inches when measured on the same yard stick I used to cut it.
Take the plastic wrap off of the package and wrap thread several times around the bias tape or piping. Place the binding or piping, card board and all, into a glass dish. One color per dish. Poor in enough water to cover and microwave until it steams. Check the water for excess dye. If the water is discolored, pour it off, add more water and microwave again. When the water is clear squeeze out the binding and allow it to air dry.
When the bias tape or piping is dry, press it with lots of steam. Treat the it very gently. Do not pull on it and stretch out all of the shrinkage. Just press the folds backdown. As it is pressed wind it around a toilet paper tube to keep it neat.
Pattern
This design is for an 8 panel skirt with an elastic waistband. the skirt must have an even number of panels for the design to come out right. If you have an 8 panel skirt pattern that fits then skip down to 'Dividing the Panel' at the bottom of this section. If you need a custom made skirt pattern follow these instructions.
Flat circle skirt pattern for an elastic waist band.
This pattern is designed to be pulled on over the hips. The advantages of the elastic waist band are, more pot luck forgiving and easily altered. A skirt without any seams can be made, with this pattern, by using wider fabric, a bed sheet or a table cloth.
Materials
1. pattern paper - Pellon 110 Blue Lines or HTC Red Dot Grid - 2 yards for each skirt
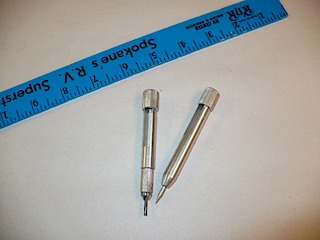
2. Dritz or Omnigrid Compass Points - usually found in the quilting section. There are two types of these points. The older style fits a standard wooden yardstick as pictured. The newer style fits an Omnigrid Quilters plastic yardstick. This yardstick is pictured below in the instructions for drawing placement lines. It is 1½ inches wide.
3. wooden yard stick or plastic yardstick - to fit the Compass Points
4. calculator
5. fine point markers
Instructions
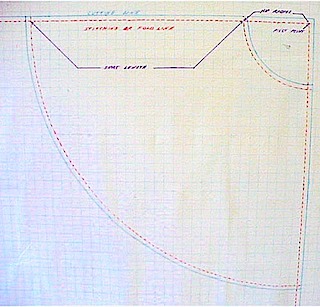
1. Layout the pattern paper and tape down the corners. Following the blue lines or the red dots trace out a large corner one inch in from the edge. This corner will be the pivot point. The lines will be stitching or fold lines. Now draw a lines one half inch out side of the original lines. These will be the cutting lines.
2. Determine the hip radius.
hip measurement_____ + 2 inches of ease =_____÷ 6.28 = ____hip radius
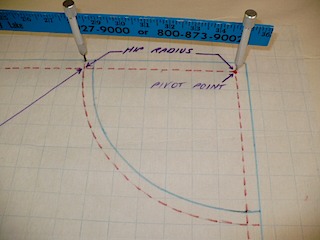
Set the compass for the hip radius by measuring between the points. Put the point of the compass on the pivot point and draw an arc. This will be the seam line. Then set the compass ½ inch smaller and draw the cutting line. Write the hip measure and the radius on the pattern.
3. Determine the total radius
hip radius_____ + skirt length_____ + ½ inch for hem = total radius______
Set the compass for the total radius by measuring between the points. Put the point of the compass on the pivot point and draw an arc. Then cut out the pattern.
To make a prairie or longer skirt the total radius may be greater than 36 inches. Take 2 yard Sticks and overlap them about a foot. Tape them together where they over lap.
Four Panel Skirt - This 4 panel skirt patten can be the basis for many other
styles. If one of the the seam lines is placed on a fold the skirt will have 2 half circles. If a wider piece of fabric is used and both of the seam lines are places on folds a seamless skirt will result.
Write the skirt length on the pattern and make a copy from pattern paper for easier layout.
Eight Panel Skirt

The easiest way to make an 8 panel pattern is to fold a 4 panel pattern in half. Trace around the folded pattern on a new piece of patten paper. Be sure to add a one half inch seam allowance to the folded edge. Cut four of this pattern to make layout and cutting easier. Mark the skirt length and other information, such as waist or hip measurement and radius, right on the patterns. Eight panels work well for two or four colors of fabric.
The panels are wide enough for applique or other embellishments. Traditional sewing guides call for the straight of grain to run down the center of each panel. This is not necessary. By setting the panels at an angle to the design on the fabric a variety of interesting effects can be achieved.
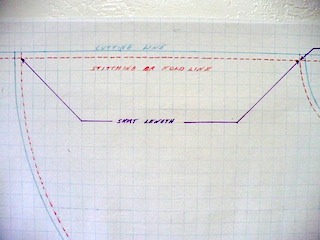
Dividing the Panel - For Any length Skirt Skirt
Take the 8 panel skirt pattern and lay it on the table. Measure down one side of the panel and find the half way point. On the other side measure up one inch up from the bottom. Draw a line connecting these two points and cut the pattern. Using the pattern paper add one half inch along the edge that was just cut for a seam allowance. Make a copy of each of these patterns.
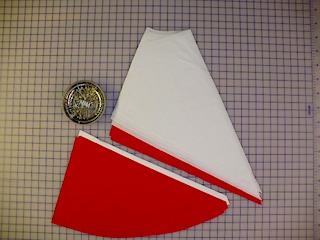

For this skirt 4 red upper panels and 4 white upper panels are needed. Also 4 red lower panels and 4 white lower panels.
When the panels are all cut lay them on a table with the points all going the same way as seen in the picture. Do this right after cutting the pieces so that they are all put together the same way. The bias cut of these pieces causes them to stretch if they are pulled, treat the pieces gently until they are all sewn together.
Pin the upper and lower pieces of the panels together. First pin the ends of the seam line, then the middle than the quarter points. The reason for pinning in this sequence is to make sure that one side does not get stretched in relation to the other. Keep the fabric on the table while pinning to provide support. This will result in a much smoother seam than trying to pin with the fabric in the lap.
When all of the pinning is finished sew all of the the diagonal panel seams. Then take all of the pieces to the ironing board and meld the seams. To meld is to press the seam just the same way it went under the presser foot if the sewing machine. This shrinks the threads and embeds them in the fabric.
Then press all of the seams toward the bottom of the skirt. Press on both sides to get a firm crease. Top stitch the seam to keep the fold in place. Press to meld the top stitching.
Prepare the stripes. Lay the single fold bias binding on the ironing board with the cut edges up. Place the Steam A Seam on the middle of the bias binding with the paper side up and press. Keep working down the bias binding until it is all attached to the SteamASeam. This is making the bias binding into an iron on applique. Grosgrain ribbon can be treated the same way.
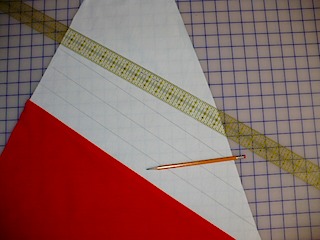
On the right sides of the upper part of the panels draw three lines one and one-half inches apart starting from the diagonal seam line. There are many different types of marking products on the market, use the one that you like best. I used a regular #2 pencil. It makes a very fine line and so far I have not found any washable fabric that pencil won't come right out of.
Peel the paper from part of the bias binding. Lay a panel piece on the ironing board and position the bias binding so that the top edge just covers the line. This will result in one inch between the stripes and the bottom strip will be one inch above the seam. There is no need to pin the bias binding. Just press it in place.
When all of the stripes are pressed into place edge stitch along all of the sides of the stripes. Use a longer stitch (4 mm or 10 spi), this will make the sewing faster and reduce puckering. Which ever foot gives you the best results is the one to choose. The open toed foot might be helpful.
When all of the panels are completed sew them together. Once again, pin the waist edge, then the hem edge, then the mid point and then the quarter points. It is always best to work on a table with the fabric supported.
When the panels are sewn together press the seams to meld. Then press the seams to the solid color side and topstitch a quarter inch from the seam line. This topstitching will keep the seam in place through many washings and also provides extra structure to the skirt.
There are several ways that the hem edge of the skirt can be finished. Remember that there is only a half inch allowed in this pattern for the hem.
Rolled Hem - Before starting a rolled hem check the edge of the skirt and make sure that it is smooth and even. A small amount may have to be trimmed off of the edge. The easiest way is to use the rolled hem attachment for the sewing machine. If the fishing line is placed inside of the roll as it is formed the hem will be crisper and have more body.
Serger - A serger can be used to make a rolled hem or a wider decorative finish. Trim off a quarter inch while serging. This is another place where the fishing line can be incorporated into the hem. Consult your serger manual.
Piping - Red, black or white piping can be purchased at the same time as the bias binding for the stripes. The cord in the piping is 100% cotton so it will shrink. Preshrink it just like the bias binding. When applying piping be sure to stretch slightly on the skirt and ease the piping for best results. Most of the instructions for applying piping call for the use of the zipper foot. There is a special piping foot available for any sewing machine. It has a special tunnel through the middle that allows the foot to maintain contact with the feet dogs on both sides of the project. This foot can be purchased from your sewing machine dealer or there are generic feet available at fabric store. This foot will more than pay for itself with this project.
Double Fold Bias Binding - Apply the double fold bias binding to the bottom edge of the skirt. The there are several factors to watch for when applying double fold bias binding. In packaged binding one side is a little wider than the other, the wider side should be on the bottom when sewing. This ensures that both edges are caught by the stitches. Pull just a little on the skirt fabric to stretch it and ease the bias binding. If the bias binding gets pulled it will shrink and pucker the first time it is washed. The bottom edge of the skirt is a slight bias so it will stretch a little bit. This is to the stitchers advantage. The bias binding can be applied with a stright stitch or a zig zag, This is the place where the fishing line comes in to use. As the bias binding is being applied, place the fishline in the fold. This will give extra spring to the hem edge of the skirt and lift it off the petticoat. It will keep the edge looking new longer. It will not melt when pressed.
Last check - When the hem finish is in place double check the length of the skirt. If it is to long cut off the necessary amount from the waist edge. Remember to leave one half inch for a seam allowance. If the skirt is too short, find a short friend and give it to her. There is no way to lengthen this skirt after it is cut.
Apply the waistband of your choice. Remember that the waist band must be large enough to go over the dancers hips.
Elastic Waistbands
Elastic waistbands are usually more potluck forgiving and easy to alter. The main problems with elastic waistbands are that they can be lumpy and tend become twisted. The reason for some of these problems is that the length and thickness of the fabric. The fabric of the waistband must be long enough to go over the hips and then when all of that fabric is pulled in to fit the waist it is too thick and forms lumps. An elastic waistband can not always be made out of the same fabric as the skirt. If the skirt is of a thicker or stiffer fabric, a matching or contrasting waist band can be made from lighter weight fabric. This will reduce a lot of the bulk around the waist.
There are many ways to make an elastic waist band. Try one of these ideas.
Triple Elastic Waistband
These instructions are for a 2 ¼ inch wide waistband. The instructions for a 1 ½ inch waist band are at the end of this section.
Materials
1. Fabric for waistband - Long enough to go around hips plus two inches for ease by 5 ½ inches wide.
2. Elastic - ½ inch wide by 3 times the waist measurement.
3. A small amount of fuse web such as Stitch Witchery ©.

Instructions
1. Sew the short ends of the fabric together to make a circle. Press the seam open. Place a small piece of fuse web under the seam allowances as they are pressed open. This will keep them in place when the elastic is being drawn through. Fold the fabric in half lengthwise and press a sharp crease.
2. Set the sewing machine for a longer stitch length (4 mm or 15 spi). Edge stitch fraction of an inch from the fold all the way around the waistband. There are several special feet that can make this easier. Adjusting the needle position can result in more accurate sewing.
3. Sew completely around the waistband lengthwise three more times. The first line of stitching should be ¾ inch down from the edge stitching. To keep the stitching even mark the bed of the sewing machine. A piece of tape can be used as a guide. If the machine has a free arm place a fat rubber band around the arm to act as a fabric guide. Or the quilting guide can be used.
4. Bar tack on top of the stitches at the cross wise seam of the waist band make a being sure that the bar tack cross the seam. A bar tack is made by setting the stitch length to zero and the stitch width on a wide zig zag.
5. Sew the waistband to the top of the skirt with a ½ inch seam.
6. Pick open the cross wise seam between the bar tacks on the inside of the waistband. Use the seam ripper to open the seam. The bar tacks will prevent the seam from opening too far.
7. Cut the ½ inch elastic in three pieces. Each should be a little longer than waist length. Insert the elastic into the channels in the waistband.
8. Put the skirt on inside out and adjust the elastic to fit. The ends of the elastic can be over lapped and sewn or tied in a knot.
For a 1 ½ inch waist band the instructions are the same except the waistband fabric is 4 inches wide, the channels are ½ inch wide and the elastic is ¼ inch wide.
Single Elastic Waistband
When making an elastic waistband there are some ideas that will make it easier.
1. Wider elastic is more comfortable than a single row of narrow elastic. Wider elastic also has more strength to prevent the square dance skirt from spinning around the waist. For elastic that is ¾ inch or wider always use elastic that is marked ban-roll or non-roll. This elastic has cross wise ribs that keep it from bending in half when stretched.
2. To determine the width of the fabric to be used in the waistband add the width of the elastic, plus ¼ inch for ease, plus ½ inch for seam allowance then double this number. To determine the length of the waistband add 2 inches to the hip measurement plus seam allowances.
3. Fuse web ironed in place under the seam allowances will keep them in place when the elastic is pulled through.
4. When making a waistband always edge stitch the top fold and stitch the bottom of the casing. The edge stitching will make the waist band sharper and the elastic will be less likely to roll. Stitching the bottom of the casing prior to attaching the skirt will prevent the layers from shifting and make attaching the skirt easier.
5. Once the elastic is adjusted to the wearer, sew across the width of the waistband in 3 or 4 places to prevent the elastic from shifting and rolling.
6. The fabric must be light enough to gather on the elastic. If the waist band must be made of a thicker fabric some of the bulk can be reduced by making the inside of the waistband from a lighter fabric.
a. Decide on the width of the elastic to be used.
b. To determine the width of the outside fabric, add the width of the elastic, plus ¼ inch for ease, plus 1 inch for seam allowances.
c. Cut the inside fabric the same width.
d. The length of the waistband fabric should be the hip measurement, plus 2 inches for ease and enough for seam allowances.
e. Sew both pieces into circles. Press the seams open. Place a small piece of fuse web under each seam allowance.
f. Place the circles right sides together and sew a ½ inch seam length wise. The width wise seam allowances should be off set, rather than on top of each other, to further reduce bulk. Trim the length wise seam allowance of the inside fabric in half.
g. Press the length wise seam allowance toward the inside fabric and under stitch. This will cause the 'turn of the cloth' effect and prevent the inside fabric from showing on the out side.
h. Fold the waistband in half length wise. Press and edge stitch the fold. This will help to prevent the elastic twisting in the casing.
i. Measure the width of the elastic plus ¼ inch from the edge stitching and sew around the waistband. It works better to sew this line before attaching the waistband to the skirt, it will keep the waistband smoother.
j. Make a bar tack at the edge stitching and at the other stitch line. Be sure that the bar tack crosses the width seam.
k. Attach the waistband to the skirt.
Pick open the seam between the bar tacks and insert the elastic. Put the skirt on inside out and adjust the elastic for comfort. Then overlap and sew the elastic ends together.