National Convention 2012 - Washington State
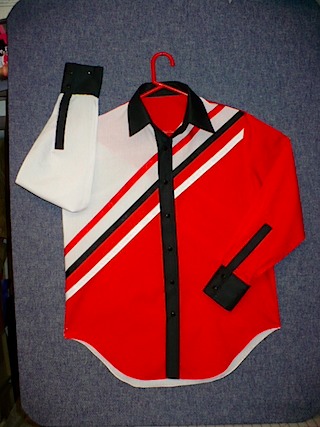
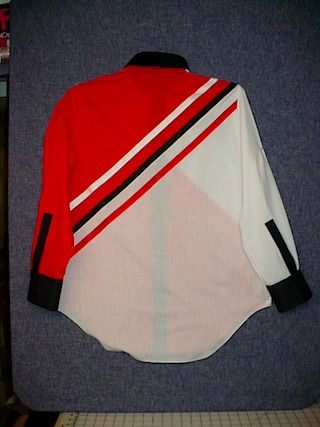
This is the design for the shirt that has been selected by the Washington State Committee for the 2012 National Square Dance Convention ® in Spokane. It is to be worn with black, white or red pants.
These instructions were written using Simplicity pattern 5366 or 4975. These patterns were selected because they come in a wide range of sizes and are easily adapted to this design. The instructions were written for the sewer who has never before made a men's shirt. Those who have more experience may find these instructions very long and they may have other techniques for some of the steps. Consider these instructions as a suggestion for the process. Please read completely through the instructions before starting. If there are any questions or suggestions please contact me.
Materials
1. 1 1/2 yds. red broadcloth
2. 1 1/2 yds. white broadcloth
3. ⅔ yds. black broadcloth - for sizes up to 1XL
4. 1 ¼ yds. black light weight iron on interfacing Pellon Shirt fuse 114 If black is not available white interfacing can be used.
5. 2 yds. red grosgrain ribbon 5/8 inch wide
6. 2 yds. white grosgrain ribbon 5/8 inch wide
7. 2 yds. black grosgrain ribbon 5/8 inch wide
8. thread - red, white and black
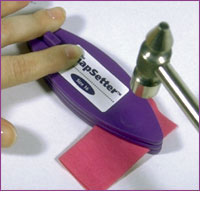
9. Black Snaps -These can be difficult to find locally. Snap Source (www.snapsource.com) carries all types of snaps. These are Size 16 (7/16") Black #19162. At least ten snaps will be needed for a shirt. Six down the front and two on each sleeve. Order the snaps before starting work on the shirt so that they arrive before they are needed. The Snap Setter Tool is a very easy and accurate way to set snaps.
10. Steam a Seam 2 - ½ or ¼ inch wide.
I thought that the ribbon would not have to be stitched in place if Steam a Seam was used. I was Wrong. After several washings the ribbons can come loose.
11. Pattern - Simplicity 5366 or 5957 or other mens shirt pattern. This pattern has a full back pattern piece Determine the correct size pattern by the neck measurement.
12. 2 yds. Pattern Paper - Found with the interfacing in fabric stores Pellon 110 or HTC
13. Fine point markers, yard stick, tape
14. A new needle Universal 80 - This is the least expensive part of this project. Always start a new project with a new needle to ensure smooth even stitching.
Pattern Size and Fitting - If you already of have a patten to fit the man you can skip this part.
Determine pattern size
The first area to fit is the collar. The wearer must be able to button the collar and place a finger inside with comfort. Even if the gentleman does not ever button the collar it must be the proper size or the front and shoulders will not hang properly. Purchase the pattern by the collar size. Experience has taught that most men are difficult to measure and fit because they won’t hold still. The way to get around this is to use an existing shirt that has a well fitting collar. Have him button the collar so that you can be sure that it fits. Now measure the shirt collar, don’t just read the numbers on the tag. Measure from the center of the button to the far end of the button hole. Purchase the pattern by the collar size. This is not given in the pattern books but it can be found on the back of some pattern envelopes. If it is a multi-size pattern it is actually the larger size. Measure the collar stand pattern piece the same way to make sure you have the right size.
Size 34 36 38 40 42 44 46 48-1XL
Neck 14 14 ½ 15 15 ½ 16 16 ½ 17 17 ½ inches
Size 50 52-2XL 54 56-3XL 58 60-4XL 62 64-5XL
Neck 18 18 ½ 19 19 ½ 20 20 ½ 21 21½ inches
The place to measure a man's neck is directly over the adams apple and add one-half inch.
Preparing the Fabric
Preshrink the fabrics in very hot water with detergent. The red and black fabrics have a lot of dye and can bleed out onto the white fabric once the shirt is completed. Washing also removes sizing from the fabric. Sizing is starch like stuff that is used to get the fabric through the weaving process. Sizing can cause skipped stitches and it can prevent the interfacing from fusing to the fabric. Set the dryer on high heat and completely dry the fabric. It is the dryer that causes the most shrinkage.
Preshrink the interfacing by placing it in hot water. Allow it to stay in the water until it cools. Take the interfacing and fold it in a towel to blot out the water. Do not wring or twist. Lay the interfacing on a table and allow it to dry.
Toss the grosgrain ribbon in the washer with the same colored fabric. Grosgrain ribbon does not usually shrink or bleed, but it is best not to take any chances.
Dividing the Pattern
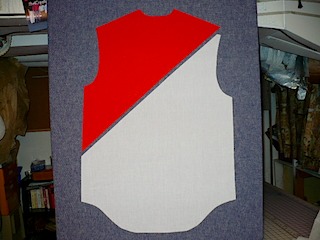
1. Lay out the back pattern piece on the fold of the patten paper to make a full back pattern. Mark all notches and dots on both sides of the new pattern. Hold the back pattern piece up against the man and mark his belt line. This may or may not be where the waist is marked on the pattern. Draw a horizontal line across the pattern at the belt line.
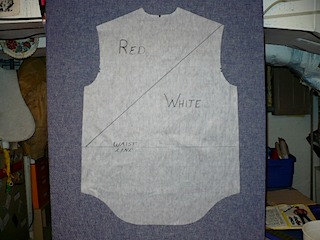
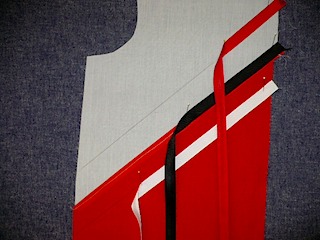
2. Draw a diagonal line from the upper right shoulder to the point where the belt line meets the side seam. Measure from the bottom of the arm scye to the belt line. Above the line write 'Red' below the line write 'White'. Cut the pattern on this line.
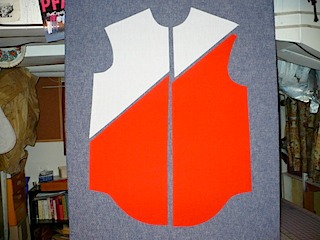
3. Lay out the front pattern piece on two layers of pattern paper and cut out two front patterns. Mark all notches and dots on the new patterns. Measure down from the bottom of the arm scye to the belt line and mark the belt line.
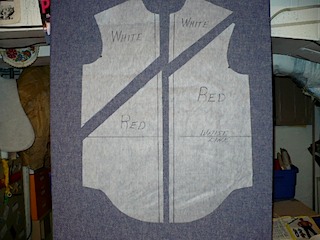
4. Position the two pattern fronts so that the front edges just meet, not overlap. It may help to pin them to a strip of pattern paper to hold them in place. Draw a diagonal line from the upper left shoulder point to the belt line side point. The left shoulder of the pattern is on the right as you are looking at the pattern. The diagonal line should go the same direction as the line that was drawn on the back pattern piece.
Write 'white' above the diagonal line on both pattern pieces. Write 'red' below the line on both. Cut across both patten pieces along the diagonal line and unpin them.

5. A seam allowance must be added to all of the edges of the diagonal lines. This can be done by cutting strips of pattern paper one inch wide. Draw a line down middle of the length of the strips. Position the strips along the diagonal line to add a ½ inch seam line to the diagonal edges. These strips can be taped or sewn in place. Pattern paper is easy to sew, set the stitch length as long as possible.
Lay out and Cutting
6. Lay the pattern pieces on a single layer of the red or white fabric according to the labels. Be sure that the writing is right side up. Always place pattern pieces at least one inch from the salvage edge. It is tempting to use the salvages for the straight lines but they will shrink and pucker in future washings. To prevent the pattern pieces from getting turned the wrong way, leave the patterns pinned to the fabric until ready to sew.
7. Lay the sleeve pattern on the white fabric with the writing right side up. Cut it out and mark the notches dots and the markings on the bottom of the sleeve. Lay the sleeve pattern on the red fabric with the writing side down. The white sleeve will be the right sleeve and the red sleeve the left. Place a small piece of masking tape on the right side of each sleeve. It is very easy to get confused and end up with two sleeves for the same side because the fabric is the same on both sides.
8. Treat the cut fabric gently. The diagonal cuts are all bias lines and they will become stretched out easily. Lay the pattern pieces out on the table the way that they fit together. Pin one end, then the other end and then pin the center. Pinning in this manner reduces stretch on the bias. Sew the fabric gently do not pull on it. Allow the machine to do the work.
9. After sewing the diagonal seam, press it toward the bottom of the piece and top stitch the seam allowances ¼ inch from the seam. This will keep the seam flat and stabilize the diagonal. This top stitching will be covered by the black grosgrain ribbon.
Preparing the Black Fabric
10. Place the black fabric on the ironing board and press it with lots of steam. While it is still hot, lay the interfacing on the fabric coated side down. Before starting the actual fusing process hold the iron about ½ inch above the interfacing and steam it. Don't allow the iron to rest on the interfacing, just keep the steam button pressed and go over the entire piece with steam. Then starting in the middle fuse the interfacing to the fabric.
There are four things that make a good bond between the the fabric and the interfacing. They are heat, steam, pressure and time. The iron must be set on cotton to melt the glue. Steam liquifies the glue and spreads the heat. Pressure forces them together and it takes time for these things to happen. Lower the ironing board to waist level and press down very hard. Hold the iron in each spot for 10 seconds. Use a watch with a second hand. Move the iron to the next section and press again. If the iron does not have a lot of steam use a thin damp press cloth. When the interfacing side is completely pressed turn it over and repeat the process on the fabric side. After the pressing is completed, allow the fabric to cool completely on the ironing board before moving it. This takes a little time to do but it will insure that the interfacing does not bubble or peel when the garment is washed.
11. Fold the black fabric in half lengthwise and place the front band, collar, collar stand, cuff and cuff placket pattern pieces on the fabric. If the length of the front of the shirt was increased to fit over a tummy, remember to lengthen the front band the same amount.
The cuffs can be made taller for a more western look. Increasing the height of the cuff lengthens the sleeve. If a placket closure is going to be used on the sleeves the placket can be cut at this time. The placket closure will be detailed later in these instructions. If a vent opening is going to be used on the sleeves follow the instructions with the pattern. The vent strips should be cut from red and white fabric to match the sleeves.
Preparing Collar and Collar Stand
12. Sew the collar pieces together across the long edge. Trim the under collar seam allowance in half and and trim the ends at a 30 degree angle. Press both of the seam allowances toward the under collar. Top stitch on the seam allowances ¼ inch from the seam line. This top stitching will cause the collar to fold neatly.
13. Fold the collar, right sides together, and sew the ends of the collar. Start stitching at the open edge and sew toward the collar point. About ½ inch from the point reduce the stitch length to 1 mm (6 spi) and sew straight off the end. Do not back stitch. Back stitching causes a lumpy point. Trim the under collar seam allowance of the ends and trim the point at a 30 degree angle.
14. Turn the collar right side out and press. Stitch across the bottom edge of the collar about ¼ inch from the edge. This will keep the pieces from shifting when sewn to the under collar. Top stitch the collar around the other three sides ¼ inch from the edge. It is easier to top stitch the collar before it is sewn into the shirt.
15. Take one of the under collar pieces and fold up the bottom edge 5/8 inch and press a very sharp crease. This will be the inside under collar.
16. On the both front bands sew a line exactly 5/8 inch from the notched edge. This is to mark the seam line. Fold the band in half length wise, with the right side out. Press the fold into a very sharp crease. Top stitch along the crease ¼ inch from the edge.
17. Fold the un-notched edge of the front band under 5/8 inch. The fold should just cover the line of stitching on the notched side. Press a very firm crease. Set the black pieces aside and work on the body of the shirt.
Shirt body and Trim
19. Draw two lines on the body pieces 1 ½ inch from the diagonal seams. A very sharp #2 pencil works well on this fabric and washes out easily.
20. Prepare the the grosgrain ribbon for attachment to the shirt. Lay the ribbon on the ironing board and apply the Steam a Seam 2. Just lay the Steam a Seam 2 paper side up on the ribbon. Press it to the ribbon. Allow the ribbon to cool and peel off the paper. This turns the ribbon into an iron on trim.
21. Lay the body piece of the shirt on the ironing board and press to warm the fabric. Position the center of the black ribbon exactly over the seam where the white and red meet. Press the ribbon down. Trim the ends of the ribbon so that they do not get stuck to the ironing board.
22. Position the red ribbon on the white side of the shirt so that the edge of the ribbon just covers the line. Press the ribbon down. Position the white ribbon on the red fabric.
23. Stitch the edges of the ribbons. If they are not stitched they will work loose after several washings.
Attaching the Bands and Collar
24. Attach the black front bands to the shirt fronts. Stitch the right side of the notched edge of the band to the wrong side of the shirt front. Sew a 5/8 inch seam exactly on top of the line of stitching used to mark the fold line. Press both seam allowances toward the band. Top stitch the seam allowance to the band.
25. The band should now fold into place. The fold of the unnotched side should just cover the stitching. Press the front band and a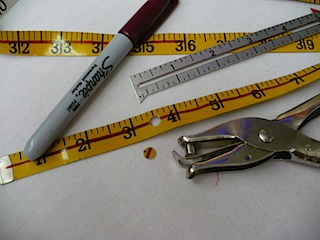 djust as necessary.
26. Edge stitch ¼ inch from the fold of the front band.
27. Mark the inside of the bands and apply the snaps now. It is a lot easier to work with the shirt fronts before they are sewn to the back. The position of the top snap is up to the person who will be wearing the shirt. On purchased shirts the snaps start between 2 and 4 inches from the collar. The rest of the snaps are between 3 and 4 inches apart. Ask your man which shirt he likes best and use those snaps as a guide.
One way to insure that the snaps are positioned accurately on the left and right shirt fronts is to make a positioning tool. Take an old tape measure and with a hole punch make holes at 4 inches, 8 inches, 12 inches and every four inches until it is as long as the front band. Or use other measurements such as 3 ½ inches, 7 inches, 10 ½ inches, etc.
 Center this tape on the inside of each band, and mark through the holes with a sharp white pencil. Be careful. Remember that on a man's shirt the left side overlaps the right side. The left side gets the decorative snap part (capped prong) and the flat snap part (socket). The right side gets the open prong and the stud snap part. Read the snap setter instructions carefully.
 www.snapsource.com - Click Here
18. Stay stitch the neck edges of the body pieces an exact ½ inch down from the edge.
28. Sew the shoulders of the front and back pieces together. Press these seam allowances toward the back of the shirt and top stitch ¼ inch from the seam line. This will keep the seam neater and stronger.
29. Clip the neck edge every ½ inch. The clips must extend down to the stay stitching line. Don't be a chicken clipper. This clipping is necessary to make the curve of the neck line fit the straight edge of the collar stand.
30. Placing right sides together sew the out side collar band to the shirt. It is the one that is not folded. Press the seam allowance toward the collar stand.
31. Match the center marks and sew the collar to the upper edge of the collar stand.
32. Sew the inside collar stand to the out side collar stand. At the curved ends of the collar stand shorten the stitch length. This will give better control when going around a curve and more secure stitching. The machine will be less likely to skip stitches if the needle is positioned center or left, not on the right.
33. Trim the curves of the collar stand to 1/8 inch. The curves must be trimmed this close to make them smooth when they are turned. Trim the upper edge of the under collar to ¼ inch. Trim the seam allowance of the collar to ½ inch.
34. Turn the collar stand right side out and press it carefully. The fold that was pressed into the lower edge of the inside collar stand should just overlap the stitching. Top stitch all around the collar stand.